Because I couldn't find anything online, here's my contribution to the community. This code snippet shows you how to send a message using the C# SDK for the Exchange Mail REST API.
IMessage message = new Message();
Recipient recipient = new Recipient();
recipient.Name = "abcde";
recipient.Address = "abcde@12345.onmicrosoft.com";
ItemBody body = new ItemBody();
body.Content = "Hey!";
message.Body = body;
message.ToRecipients.Add(recipient);
await mailClient.Me.Messages.AddMessageAsync(message);
Wednesday, October 8, 2014
Monday, September 22, 2014
Making a REST call to the Files API
In this post, I'll show how to make a REST call to the Files API.
Note: There is a good article written by Matthias Leibmann, Program Manager in the Exchange team, on using OAuth to access Calendar, Contact and Mail API in Office 365.
It's not as easy as doing a "GET" request to a single endpoint. You first have to go through the Oauth flow, of course, because you want to get meaningful user data.
I'm using Advanced REST client, an app for Chrome that you can obtain in the Chrome Web Store.

It seems that lots of folks use Fiddler, but I find it overly complicated and too heavy for this purpose. Advanced REST client is really lightweight and focuses on making REST requests and seeing responses. If you want more, check out Fiddler.
1. Assuming you have already registered your application with Azure (a post on how to do this will be coming up soon), you can use Advanced REST Client to make a GET authorization request:


In the header of the request, put:

Note: There is a good article written by Matthias Leibmann, Program Manager in the Exchange team, on using OAuth to access Calendar, Contact and Mail API in Office 365.
It's not as easy as doing a "GET" request to a single endpoint. You first have to go through the Oauth flow, of course, because you want to get meaningful user data.
I'm using Advanced REST client, an app for Chrome that you can obtain in the Chrome Web Store.
It seems that lots of folks use Fiddler, but I find it overly complicated and too heavy for this purpose. Advanced REST client is really lightweight and focuses on making REST requests and seeing responses. If you want more, check out Fiddler.
1. Assuming you have already registered your application with Azure (a post on how to do this will be coming up soon), you can use Advanced REST Client to make a GET authorization request:
response_type=code
&client_id=YOUR_CLIENT_ID_HERE
&resource=RESOURCE_HERE
&state=SOME_UNIQUE_STRING_HERE
&redirect_uri=YOUR_REDIRECT_URL_HERE
Resource looks like "https://dreamfactories-my.sharepoint.com", client id looks like "08632ea7-3847-48b8-b43a-b99568e3a2c4", state is some unique string used to prevent CSRF (you can put something like "12345" for demo purposes), redirect URI is the URL that you registered in AAD for where your users will be sent after authorization. Note that for the purposes of this demo, you don't actually have to point to something valid that is own your domain. You can just put "https://www.google.com", as long as it matches with what you registered in Azure AD.
Press Send and you get a response that looks like this:
See that ?code= query parameter after https://www.google.com? That contains the authorization code. Copy that.
2. Make another request to obtain an access token so you can actually make calls to the resource. The POST request looks like this:
POST https://login.windows.net/common/oauth2/token
In the body of the request,
client_id=YOUR_CLIENT_ID&client_secret=YOUR_CLIENT_SECRET&code=AUTHORIZATION_CODE_FROM_STEP_1&grant_type=authorization_code&redirect_uri=YOUR_REDIRECT_URL
Client ID is from Azure AD, Client Secret is the same as "Key" and is also from Azure AD. Code is the authorization code you obtained in Step 1. Grant type is authorization code because that is the information you are sending over. Redirect URI is what you registered on Azure AD.
The screenshot above shows what you should send and what you'd receive. Notice you get an access token. Copy that.
3. Make a request to get files from the user's OneDrive for Business. The GET request looks like this:
GET https://dreamfactories-my.sharepoint.com/personal/kloh_dreamfactories_onmicrosoft_com/_api/files
In the header of the request, put:
Authorization: Bearer {YOUR_ACCESS_TOKEN_FROM_STEP_2_HERE}
You'll be able to figure out what to put before /_api/files from the discovery service. A blog post on that will come soon. You'll get what looks like this:
Voila! The response contains your files!
As promised, posts on Azure AD app registration and Discovery Service will come soon. Check this blog regularly for updates!
Friday, September 5, 2014
Running the Mail Sample Project for Office 365 Android SDK
My previous post covered setting up the Office 365 Android SDK and configuring it within Eclipse/ADT. I also wrote about the import errors that you may see, and how to fix those.

3. Run it on either the emulator or your device.


Now let's actually run the sample projects to see what the new Office 365 APIs can do!
Note: As of writing, the APIs are still in Preview. They shouldn't be used in production as we may make breaking changes before they are released. Expect irregularities, and teething problems as we work hard to make them ready for use in your production code. Send feedback to the team through our page on UserVoice.
Which sample do you run? Well, the Office 365 Android SDK Github repository contains 7 Android projects (excluding the Tests, which shouldn't matter to you much):
- office365-base-sdk
- office365-files-sdk
- office365-lists-sdk
- discovery-files-sample
- exchange-sample
- read-sp-list-sample
- read-write-sp-list-sample
The intention of having 3 different SDK projects is so that you don't have to pick between all, or nothing. You can just bundle whichever is appropriate for your project, and cut out the other functionality you won't be using, thus keeping your app as lightweight as possible.
The intention of having 4 samples is that each one focuses on a different end-to-end scenario which might be useful to you. If you're writing a mail app, for example, you probably wouldn't want to worry too much about OneDrive for Business files.
Let's just scope our attention to the Mail sample project (i.e. exchange-sample) for this blog post.
All the import errors should have been solved if you've followed my previous post.
1. Register the app in Azure.
2. Go to the Constants class. Change the value of the CLIENT_ID string to your app's client ID in Azure. (Coming soon: A post on how to register your app on Azure). It should look something like this:
3. Run it on either the emulator or your device.
Do you get a DEVELOPER_ACTIVITY_IS_NOT_RESOLVED error?
If so, it's because the SDK hasn't been updated yet to reflect the new naming structure of the updated Azure Active Directory Library for Android. Remember how we added .aad in the import statements for all the classes that use the ADAL? We also need to update AndroidManifest.xml. Make sure the reference to the AuthenticationActivity in adal looks like this:
4. Try running it again. The app should launch, and you'll see this:
Sign in with your organization ID, e.g. abc@xyz.onmicrosoft.com, or abc@contoso.com. You cannot sign in with a Microsoft Account (MSA). An MSA would look something like abcdef@hotmail.com or abcdef@outlook.com.
After signing in, you'll see a view asking you to approve granting certain permissions to the app:
Note: Don't be unduly worried by the long list of permissions you see above. That's because in my Azure Active Directory, I registered the app and gave it all the available permissions in the drop-down. You don't have to do that; you can probably get away with just giving the app a limited subset of permissions.
After you approve those permissions, you'll see your inbox:
Ta-da! The app pulls in email from the Exchange server and displays them to you. You can click on each email to see the entirety of the message.
Wednesday, September 3, 2014
Setting up the Office 365 SDK for Eclipse/ADT
Office 365 APIs is a set of APIs that allow you to consume and interact with Office 365 services like SharePoint, OneDrive for Business, and Exchange. As of September 2014, the APIs are currently in Preview. While it's not encouraged that you use the APIs in production because changes that break your code may be pushed anytime as the APIs get fully fleshed out and kinks get ironed out, it makes sense to start building applications that integrate these APIs so that you can hit the ground running once they are released.
Besides the .NET SDK for developers used to the Microsoft stack, the team has also released an Android SDK. Like the REST APIs it is based on, the Android SDK is also in preview.
Let's look at how to set up the Office 365 SDK for Android development. I'm going to assume you're using Eclipse ADT.
1. Head over to the GitHub repository and download the SDK. You can either Download ZIP or Clone in Desktop.

2. In Eclipse, go to File > Import > Existing Android Code into Workspace. Browse to the location where you cloned the SDK, or where you unzipped the files that you downloaded. Select all the Android projects except the Test projects.
3. You'll see a bunch of scary-looking exclamation marks and import errors after you've imported the Office 365 SDK android projects. Let's find out what's causing these import errors and try to solve them one-by-one.

 Nothing scares me more than 589 errors... but I'll show you that these are actually relatively easy to fix and will disappear in no time at all!


5. If you go to the office365-base-sdk project, and you select libs > getLibs.sh, you'll see the script for what appears to be a call to get the Google Guava library.

Let's just grab it off the Guava library page.

Download the jar file and simply paste it into the libs folder of office365-base-sdk.

6. This pretty much fixes the errors in office365-base-sdk, office365-files-sdk and office365-lists-sdk. Now let's see what's ailing the sample projects discover-Onedrive-files-sample, exchange-sample, read-sp-list-sample and read-write-sp-list-sample.
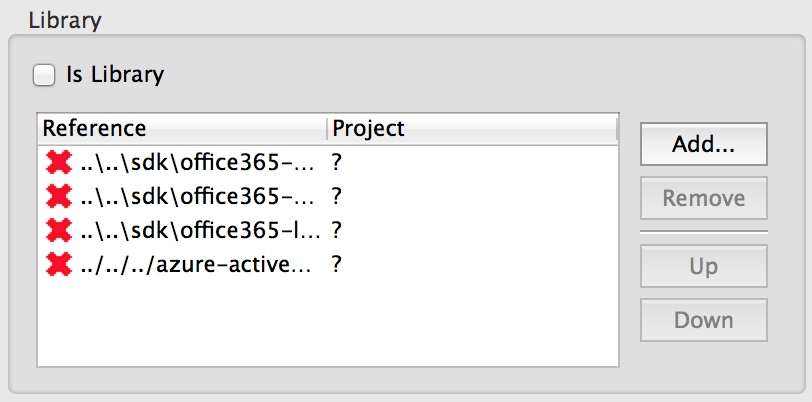
It seems that some of them have incorrect references to the Office 365 base/files/lists SDK. Fix them by removing the references to the libraries, and adding them in again (this error occurred because the path is no longer the same after you import the SDKs into Eclipse).
7. If you still get errors, especially in the import statements, add in "aad" before ".adal" as shown below. This is because the path you import from must correspond to the name of the package in Eclipse (you can open the package of the Azure AD library to see its name and make sure it corresponds)

That's it - you should be good to go! In a future post I will aim to cover how to run the samples and what they do.
Besides the .NET SDK for developers used to the Microsoft stack, the team has also released an Android SDK. Like the REST APIs it is based on, the Android SDK is also in preview.
Let's look at how to set up the Office 365 SDK for Android development. I'm going to assume you're using Eclipse ADT.
1. Head over to the GitHub repository and download the SDK. You can either Download ZIP or Clone in Desktop.
2. In Eclipse, go to File > Import > Existing Android Code into Workspace. Browse to the location where you cloned the SDK, or where you unzipped the files that you downloaded. Select all the Android projects except the Test projects.
3. You'll see a bunch of scary-looking exclamation marks and import errors after you've imported the Office 365 SDK android projects. Let's find out what's causing these import errors and try to solve them one-by-one.
4. The reference to the Azure Active Directory Library is broken. The Office 365 Android SDK requires this library for authentication using Active Directory. This allows users whose organizations subscribe to Office 365 to sign in with their organizational accounts (e.g. "abc@xyz.com").
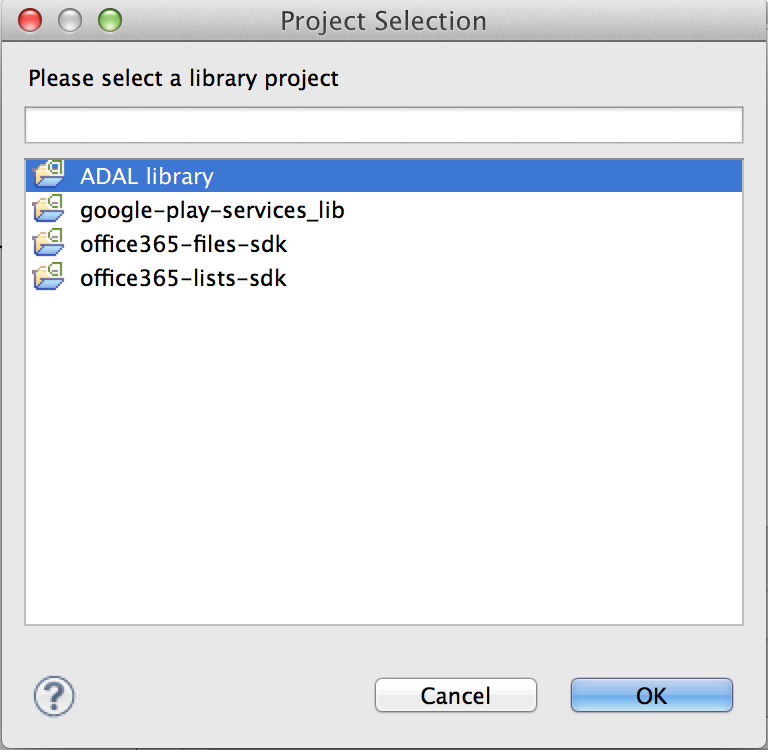
Let's fix it by selecting the ADAL library project in our current workspace. If you haven't yet configured and imported the ADAL, I've written a step-by-step guide on how to do that here.
Do this for all the projects, since all of them have references to ADAL.
Tip: When you're trying to fix errors that come with importing a new project into Eclipse, I'd highly recommend that you regularly clean the project you are trying to import. Many times I thought I'd already fixed something but the warning message still shows, and I realized it's because I forgot to clean and recompile the project. Clean the project by going to Project > Clean in the menu bar in Eclipse.
Let's just grab it off the Guava library page.
It seems that some of them have incorrect references to the Office 365 base/files/lists SDK. Fix them by removing the references to the libraries, and adding them in again (this error occurred because the path is no longer the same after you import the SDKs into Eclipse).
7. If you still get errors, especially in the import statements, add in "aad" before ".adal" as shown below. This is because the path you import from must correspond to the name of the package in Eclipse (you can open the package of the Azure AD library to see its name and make sure it corresponds)
That's it - you should be good to go! In a future post I will aim to cover how to run the samples and what they do.
Thursday, August 21, 2014
Setting up the Azure Active Directory SDK for Android
Azure Active Directory (AAD) is a service that provides identity and access management capabilities in the cloud. If you're dealing with Office 365 APIs, I can guarantee you that you will definitely run into AAD, so best to get it out of the way as soon as possible.
I'll write another post shortly about AAD and why that's an integral part of the Office 365 authentication story, but for now, let's focus on getting the AAD Android SDK set up and configured.
1. Go to the Azure AD library for Android repository on GitHub to download the SDK. Just click on "Download Zip" (its on the lower-right of the screenshot below)

2. Unzip the file. If you run into a situation when the filename is too long when unzipping, move the zip file to C:/ root and try again. This is a known problem with the default Windows unzipping tool.
Go into the unzipped folder and see all the good stuff you've downloaded.

3. Go into the src/libs folder. Open "required-libs.txt". This shows you the dependencies - namely, gson and the Android support library. Super strange that you have to dig into this text file to find out the required libraries and it's not mentioned at all on the github page.

4. If you don't have it already, you can download gson here. You'll want to go for the gson-2.x.jar file. Save that file into the src/libs folder that you opened earlier in step 3.

5. Import the AAD Android project into Eclipse (Go to File > Import > Existing Android Code into Workspace)


6. Notice that the project doesn't compile. There are squiggly red lines indicating dependencies that are not found.

7. Of course, we haven't yet added the Android support library. Add it by right clicking on the AuthenticationActivity project (i.e. the source code, not the sample) and then Android Tools > Add Support Library. Agree to the terms and conditions.

8. The AAD library is set up and ready to be used! To try it out, right-click on the sample project and select Run As > Android Application.
I'll write another post shortly about AAD and why that's an integral part of the Office 365 authentication story, but for now, let's focus on getting the AAD Android SDK set up and configured.
1. Go to the Azure AD library for Android repository on GitHub to download the SDK. Just click on "Download Zip" (its on the lower-right of the screenshot below)
2. Unzip the file. If you run into a situation when the filename is too long when unzipping, move the zip file to C:/ root and try again. This is a known problem with the default Windows unzipping tool.
Go into the unzipped folder and see all the good stuff you've downloaded.
3. Go into the src/libs folder. Open "required-libs.txt". This shows you the dependencies - namely, gson and the Android support library. Super strange that you have to dig into this text file to find out the required libraries and it's not mentioned at all on the github page.
4. If you don't have it already, you can download gson here. You'll want to go for the gson-2.x.jar file. Save that file into the src/libs folder that you opened earlier in step 3.
5. Import the AAD Android project into Eclipse (Go to File > Import > Existing Android Code into Workspace)
You'll want to select the source code and sample project.
6. Notice that the project doesn't compile. There are squiggly red lines indicating dependencies that are not found.
7. Of course, we haven't yet added the Android support library. Add it by right clicking on the AuthenticationActivity project (i.e. the source code, not the sample) and then Android Tools > Add Support Library. Agree to the terms and conditions.
8. The AAD library is set up and ready to be used! To try it out, right-click on the sample project and select Run As > Android Application.
Tuesday, August 12, 2014
Common Questions and Answers to Getting Started with Office 365
Let's say you've signed up for an Office 365 developer account. The following is what you get access to:

Q: Can I download Word, Excel, PowerPoint, Outlook, OneNote for free now?
A: Yes, click on the red "Install now". I'm not sure if your developer account allows you to use them for the duration of your developer trial, but I'm pretty sure they won't work after your 30-day trial expires anyway. This isn't a way to get Microsoft Office for free. The point of having those apps there for you to download is to show that for any Office 365 user, they get installations of the Office apps that comes with their Office 365 subscription that they either purchased themselves or that their company purchased for them.
Q: Why does my "OneDrive" or "Sites" icon remain grayed out even after a few minutes?
A: SharePoint is still provisioning. When you set up an Office 365 tenant (remember: a tenant looks like @abc.onmicrosoft.com or @abc.com), you are saying that I'm buying Office 365 for all the users belonging to my company which has a domain name of abc.onmicrosoft.com or abc.com. Office 365 doesn't only include Word, Excel, PowerPoint etc., it also includes SharePoint (a powerful intranet/file management and collaboration solution) and Exchange (an email server that allows you to provide email services for your company). SharePoint and Exchange used to be sold as software in boxes, but now they are all online as part of the Office 365 cloud solution. The icons "Sites" and "OneDrive" represents SharePoint. In particular, it may take some time for SharePoint for your abc.onmicrosoft.com or abc.com company to set up so be patient.
Q: It still remains grayed out even after 1 hour!
A: SharePoint probably failed to provision. This is something that we are aware of and working on fixing. Please post your problem on the community forums (click on "?" in the top right hand corner) and someone will work with you to fix your specific problem.
Q: What is the difference between OneDrive here and OneDrive.com?
A: "OneDrive for Business" is distinct from "OneDrive.com" and "OneDrive". The Pro/Business solution is essentially a file management solution from SharePoint that is a cloud storage solution for your company. OneDrive.com is cloud storage for individuals. Let's say you are working on an important proposal for a meeting next week at work. That would probably go onto OneDrive Pro and not OneDrive.com. But if you want to store your own photos taken at your kids' birthday party, that would go onto OneDrive.com. In the context of Office 365 tenants and developer accounts, the word "OneDrive" refers to "OneDrive for Business". Outside the context of the enterprise, the word "OneDrive" refers to "OneDrive.com" or OneDrive for consumer services.
It's confusing, I know. That's why I'm here - feel free to post your questions in the comments below.
Register so you can use O365 APIs
There's lots of confusion over what you need to do before you can use Office 365 APIs so I'm clearing that up here.
You need an O365 developer account. Sign up here for a 30 day free trial. It costs $99/year thereafter.
=> If you are an MSDN subscriber (with Visual Studio Premium or Visual Studio Ultimate), you can get this developer account for FREE.
Let's say you want to sign up for the 30 day free trial.
First you enter your personal details:

Then you tell Microsoft what you want your tenant domain and username to be. Office 365 is aimed at enterprises, so imagine a situation where a company A has its own in house developer named B. So in this case, the tenant domain will be @companyA.com and the username will be developerB. So developer B's login account to Office 365 will be developerB@companyA.com. In this case because you are signing up for a free trial Microsoft doesn't have domains like ____.com to give away. You have to use _______.onmicrosoft.com but you can later associate this to your own domain.

The next step is a verification step:

Enter the verification code you receive:

Wait a few seconds while your account gets created:

Your account is created.

You will receive an email with your tenant domain and username. This is handy information in case you forget. Note that my user ID is kloh@kaitest.onmicrosoft.com - this is a completely different sort of account from a ABC@outlook.com/ABC@hotmail.com type of account. The former is an Office 365 tenant account where the latter is a Microsoft account. Think of the difference as the former being an enterprise log-in that you use at work, and the latter being your own personal account that you use for Bing, Outlook.com, and all of Microsoft's consumer services.

Now when you click on "Access your Office 365" in that email, or if you click on "You're ready to go..." in that registration screen, you get to this:

And there you have it! You've set up a developer account for Office 365.
If any of the "tile" icons representing Word Online, Excel Online, PowerPoint Online, OneDrive, Sites, Outlook, Calendar or People are grayed out, that means these services haven't finished provisioning yet. Give them a few more minutes, and when you refresh, they should be ready to use.
That's all you need to start using O365 APIs!
Sunday, August 10, 2014
Hello World!
My name is Kai, and I'm a Program Manager on the Office Developer Platform team at Microsoft. I'm creating this blog because I want to share the great secret that is the Office 365 API. This is a new powerful REST-based API with client libraries that allow you to consume SharePoint, Exchange and Azure Active Directory data in a single API.
Here are some things you can do with the Office 365 API:
- Request authorization from end-users to provide access to their mail, contacts, calendars and files to your app
- Create, organize and move files
- Access emails, folders and attachments
- Update calendar groups, calendars and appointments
- Create new contacts
This is a useful resource: dev.office.com, the official site for developing on Office. You can download tools, follow step-by-step tutorials and browse reference documentation.
---
All information on this blog are my own views and do not represent that of Microsoft. If there's anything inaccurate, please get in touch with me. You can leave a comment on any of my posts.
Subscribe to:
Posts (Atom)